

Design
Having decided to benchmark mice, there was several ways of going about it. The simplest method was to plot a graph of mouse response vs movement speed. Mouse response would be measured in counts per second (from Windows DirectInput) and movement speed would be measured in metres per second. DirectInput is easy to access so measuring the response of a mouse is fairly simple to do, and can be done very accurately. The tough part is measuring how fast the mouse is physically moving at the same time. After considering and discarding various options, I decided in the end to create a test setup where the mouse would be held stationary and the mousepad would be moved at a constant speed.
There are two obvious ways to move a mouse surface over the mouse sensor while keeping the mouse stationary. The first is to create a drum of the mouse surface, and spin the drum with the mouse sitting on top. There are some problems with this, particularly making sure the drum surface stays level when spinning otherwise the mouse will be bounced off.
The easier option was using a turntable layout. This involved having the mouse surface on a horizontal rotating disc constantly spinning. The mouse is then placed on the surface at a fixed radius. The mouse sensor actually sees the surface moving in a straight line, even though it is actually spinning. Then it's down to measuring the radius at which the mouse sensor is placed and the speed at which the turntable is spinning to find the speed.
Click for larger photos
Build
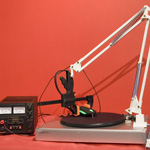
The obvious starting point for the benchmarking machine was a record pla
This modified belt-drive turntable would be enough for basic tests, but I would need to take speed readings for my graph at more than the 3 fixed speeds provided by the switching system. To produce a more varied range of speeds I replaced the fixed power supply, with a bench supply that could provide an adjustable output up to 30 volts.
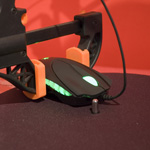
I then took my mouse surface and cut it into a circle to place on the turntable. I had a choice from many samples that had been sent to me for review, but in the end I used the SteelPad QcK+ because it turned out to be the easiest material to cut into shape and stayed flat on the turntable surface. I did also have a range of Qpad surfaces ready to test but in the interests of completing the mouse review I stuck to the SteelPad surface. In a future article I intend to compare the performance of different mouse surfaces being read by the same mouse to see if there really is any benefit to using a professional mousepad.
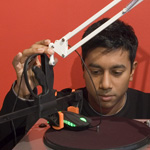
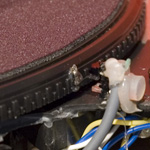
The next thing to do was to create a clamp system to mount each mouse on the spinning platter. I used a basic adjustable arm and attached a trigger clamp to the head. The geometry of the arm meant that the mouse would stay horizontal even if it was pushed up or down. This helped to keep the mouse steady under movement and the friction it caused.
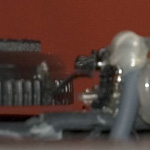
A big challenge was to accurately measure the speed at which the turntable was spinning. I originally tried to set up a microswitch that would be triggered once per revolution by a flailing arm, but it became clear this would be unreliable. In the end I built an optical tachometer with a sensor that triggered when a light beam was broken. With this method I only had to mount a small plastic arm that broken the light beam every time the turntable reached a certain point.
Click for larger photos
To generate results, I took measurements over a period of 10 seconds to get accurate readings for the speed of the movement and the count produced on the computer by the mouse. The speed would be changed only after an accurate measurement was taken.
Having decided to benchmark mice, there was several ways of going about it. The simplest method was to plot a graph of mouse response vs movement speed. Mouse response would be measured in counts per second (from Windows DirectInput) and movement speed would be measured in metres per second. DirectInput is easy to access so measuring the response of a mouse is fairly simple to do, and can be done very accurately. The tough part is measuring how fast the mouse is physically moving at the same time. After considering and discarding various options, I decided in the end to create a test setup where the mouse would be held stationary and the mousepad would be moved at a constant speed.
There are two obvious ways to move a mouse surface over the mouse sensor while keeping the mouse stationary. The first is to create a drum of the mouse surface, and spin the drum with the mouse sitting on top. There are some problems with this, particularly making sure the drum surface stays level when spinning otherwise the mouse will be bounced off.
The easier option was using a turntable layout. This involved having the mouse surface on a horizontal rotating disc constantly spinning. The mouse is then placed on the surface at a fixed radius. The mouse sensor actually sees the surface moving in a straight line, even though it is actually spinning. Then it's down to measuring the radius at which the mouse sensor is placed and the speed at which the turntable is spinning to find the speed.
Click for larger photos
Build
The obvious starting point for the benchmarking machine was a record pla
This modified belt-drive turntable would be enough for basic tests, but I would need to take speed readings for my graph at more than the 3 fixed speeds provided by the switching system. To produce a more varied range of speeds I replaced the fixed power supply, with a bench supply that could provide an adjustable output up to 30 volts.
I then took my mouse surface and cut it into a circle to place on the turntable. I had a choice from many samples that had been sent to me for review, but in the end I used the SteelPad QcK+ because it turned out to be the easiest material to cut into shape and stayed flat on the turntable surface. I did also have a range of Qpad surfaces ready to test but in the interests of completing the mouse review I stuck to the SteelPad surface. In a future article I intend to compare the performance of different mouse surfaces being read by the same mouse to see if there really is any benefit to using a professional mousepad.
The next thing to do was to create a clamp system to mount each mouse on the spinning platter. I used a basic adjustable arm and attached a trigger clamp to the head. The geometry of the arm meant that the mouse would stay horizontal even if it was pushed up or down. This helped to keep the mouse steady under movement and the friction it caused.
A big challenge was to accurately measure the speed at which the turntable was spinning. I originally tried to set up a microswitch that would be triggered once per revolution by a flailing arm, but it became clear this would be unreliable. In the end I built an optical tachometer with a sensor that triggered when a light beam was broken. With this method I only had to mount a small plastic arm that broken the light beam every time the turntable reached a certain point.
Click for larger photos
To generate results, I took measurements over a period of 10 seconds to get accurate readings for the speed of the movement and the count produced on the computer by the mouse. The speed would be changed only after an accurate measurement was taken.